Beginner guide to deploying Micro-services on Kubernetes
Simplifying Scalability and Flexibility
In today's fast-paced digital landscape, businesses are increasingly adopting microservices architecture to build scalable and resilient applications. Microservices offer a modular approach to application development, allowing different components to be developed, deployed, and scaled independently.
To harness the full potential of microservices, organizations are turning to containerization platforms like Kubernetes for efficient management and deployment.
In this blog post, we will explore the benefits of deploying microservices to Kubernetes and provide a step-by-step guide to help you get started. We will be deploying a small microservice to post a message and read messages.
Understanding Microservices
Microservices architecture involves breaking down complex applications into smaller, loosely coupled services that can be developed and deployed independently.
Each microservice focuses on a specific business capability and communicates with other services through well-defined APIs. This architecture promotes flexibility, scalability, and fault isolation, making it easier to develop, test, and deploy complex applications.
Power of Kubernetes
Kubernetes is an open-source container orchestration platform that simplifies the deployment, scaling, and management of containerized applications. It helps to manage more than one container (docker).
It provides a robust infrastructure for running microservices by automating tasks such as container scheduling, load balancing, scaling, and monitoring. Kubernetes offers several key benefits when deploying microservices:
Scalability: Kubernetes enables automatic scaling of microservices based on resource utilization, ensuring applications can handle fluctuating workloads effectively.
Fault Tolerance: By leveraging Kubernetes' self-healing capabilities, microservices can be automatically restarted or rescheduled in case of failures, ensuring high availability.
Service Discovery and Load Balancing: Kubernetes provides built-in service discovery and load balancing mechanisms, allowing microservices to locate and communicate with each other seamlessly.
Resource Optimization: Kubernetes optimizes resource allocation, allowing efficient utilization of computing resources, which results in cost savings.
An essential step in deploying a service to Kubernetes is dockerization.
Docker
Docker is an open-source containerization platform that allows you to package applications and their dependencies into lightweight, portable containers. These containers are isolated and can run consistently across different environments, providing a reliable and reproducible way to deploy applications.
Deployment on Kubernetes
Some pre-requisites
Docker - Following are the steps to install docker on a Linux-based system or WSL/WSL2. You can always refer to the official documentation for installation.
Links - Docker, Docker-compose
Steps for Linux 👇
  sudo apt update

  sudo apt install apt-transport-https ca-certificates curl software-properties-common

  curl -fsSL https://download.docker.com/linux/ubuntu/gpg | sudo gpg --dearmor -o /usr/share/keyrings/docker-archive-keyring.gpg
  echo "deb [arch=amd64 signed-by=/usr/share/keyrings/docker-archive-keyring.gpg] https://download.docker.com/linux/ubuntu $(lsb_release -cs) stable" | sudo tee /etc/apt/sources.list.d/docker.list > /dev/null

  sudo apt update

  sudo apt install docker-ce docker-ce-cli containerd.io

  docker --version
Setting Kubernetes locally
To use Kubernetes locally, you can use the 2 most common options available.
Minikube - a tool that allows you to run a single-node Kubernetes cluster on your local machine.
Docker Desktop - provides an integrated Kubernetes cluster as part along with its features to manage docker images.
Installation docs - Minikube, Docker Desktop
Installing Node.js and Typescript
In this blog, we will make the servers using Node.js and Typescript. You will most probably not require Node.js installed locally if you just want to test my code on kubernetes.
Let's start!
All the code that I will be writing henceforth is available on GitHub(link).
Step 1: Creating 2 services.
As this blog focuses on deploying a service rather than creating one, you can directly clone the blog_start branch of the repository to clone the services.
git clone -b blog_start https://github.com/SohamRatnaparkhi/twitter-backend.git
The folder structure should be -

Step 2: Create Docker images
In readPost create 2 files - Dockerfile, .dockerignore
Add the following code in readPost\Dockerfile
ARG NODE_VERSION=19.3.0

FROM node:${NODE_VERSION}-alpine

WORKDIR /app

COPY package*.json yarn*.lock ./

RUN yarn install --frozen-lockfile

COPY . .
ENV Read_post_PORT=6000

EXPOSE 6000

CMD [ "yarn", "start" ]
and in readPost\.dockerignore
dist
node_modules
Copy these Dockerfile and .dockerignore to makePost
Now, in makePost\Dockerfile, update ENV Read_post_PORT=6000 to ENV Make_Post_PORT=6001 and make sure that Ports 6000 and 6001 are free on your machine.
In the root directory of the project, i.e. twitter-backend, create a file named docker-compose.yaml and add the following code to it.
version: '2'
services:
  make-post:
    image: make-post:2.0.0
    build:
      context: makePost
      dockerfile: Dockerfile
    ports:
      - 6001:6001
    depends_on:
      - read-post

  read-post:
    image: read-post:2.0.0
    build:
      context: readPost
      dockerfile: Dockerfile
    ports:
      - 6000:6000
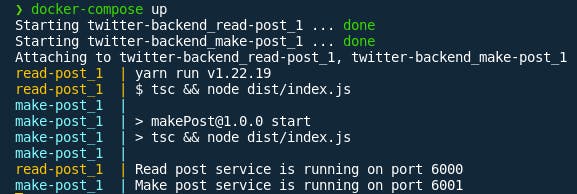
Open the terminal and in the root directory of the project run docker-compose up . If everything goes well, then in the terminal, you will get the output:

Now stop these by hitting cntr+c or cmd+c
Step 3: Deploying on Kubernetes and creating services
Intro to k8s
Now I will introduce you to some core concepts in kubernetes(k8s).
In Kubernetes, "cluster," "pod," "deployment," and "service" are fundamental concepts that are used to manage and run applications in a distributed system. Let's explore each of these terms:
Cluster: A cluster is the foundation of a Kubernetes environment. It consists of a set of physical or virtual machines, called nodes, that work together to run containerized applications. The cluster is responsible for managing the scheduling, scaling, and monitoring of containers across the nodes.
Pod: A pod is the smallest and most basic unit of deployment in Kubernetes. It represents a single instance of a running process in the cluster. A pod can encapsulate one or more tightly coupled containers and share the same resources, such as network and storage.
Deployment: A deployment is a Kubernetes resource that defines the desired state of a set of pods. It provides a declarative way to manage the lifecycle of pod replicas, enabling easy scaling, rolling updates, and rollbacks. Deployments allow you to specify the number of replicas to run, the container images to use, and other configuration parameters.
Service: A service is an abstract representation of pods that provide the same functionality. It acts as a stable network endpoint that enables communication between different parts of an application within the cluster or with external clients. Services have an associated IP address and port, allowing other pods or external systems to access the pods behind the service.
To summarize, a cluster is an overarching infrastructure that hosts your applications, while pods represent the individual instances of your application processes. Deployments manage the lifecycle and scaling of pods, and services provide a consistent way to access and communicate with pods in the cluster. These concepts form the building blocks of managing and orchestrating containerized applications in Kubernetes.
Finally, Deploying to k8s
First, we need to create a cluster. For this, you can use minikube start if you installed minikube or go to docker decktop settings, select kubernetes, and enable kubernetes. Then click on apply and restart.
In the root directory of the project, create a folder named kubernetes.
Step 3.1 - deployment.yaml
In
\kubernetescreate 2 files -makepost-deployment.yamlandreadpost-deployment.yamlIn
\kubernetes\makepost-deployment.yamladd:apiVersion: apps/v1 kind: Deployment metadata: name: makepost-deployment spec: replicas: 2 # Initial number of replicas selector: matchLabels: app: makepost template: metadata: labels: app: makepost spec: containers: - name: makepost image: make-post:2.0.0 ports: - containerPort: 6001In
\kubernetes\readpost-deployment.yamladd:apiVersion: apps/v1 kind: Deployment metadata: name: readpost-deployment spec: replicas: 2 # Initial number of replicas selector: matchLabels: app: readpost template: metadata: labels: app: readpost spec: containers: - name: readpost image: read-post:2.0.0 ports: - containerPort: 6000Step 3.2 - service.yaml
In
\kubernetescreate 2 files -readpost-service.yamlandmakepost-deployment.yamlIn `\
kubernetes\readpost-service.yaml`add:apiVersion: v1 kind: Service metadata: name: readpost-service spec: selector: app: readpost ports: - protocol: TCP port: 6000 targetPort: 6000 type: LoadBalancer # Expose the service externallyIn `\
kubernetes\makepost-service.yaml`add:apiVersion: v1 kind: Service metadata: name: makepost-service spec: selector: app: makepost ports: - protocol: TCP port: 6001 targetPort: 6001 type: LoadBalancer # Expose the service externallyNow, you have successfully created a service.
Step 3.3 - Applying these yaml files
Make sure kubernetes is running using the command
kubectlThen run the following commands:
  kubectl apply -f kubernetes/makepost-deployment.yaml
  kubectl apply -f kubernetes/readpost-deployment.yaml
  kubectl apply -f kubernetes/makepost-service.yaml
  kubectl apply -f kubernetes/readpost-service.yaml
Now you have successfully deployed a microservice on kubernetes.
You can check it by going to `http://localhost:6001/`
You will get output as
Hello World! from makePosts at port 6001What next?
Now, you can auto-scale these services. You just need to add a yaml to autoscale a particular service say makePosts.
To do so, create a file
kubernetes\makepost-autoscale.yamland add :-
apiVersion: autoscaling/v2
kind: HorizontalPodAutoscaler
metadata:
  name: makepost-autoscaler
spec:
  scaleTargetRef:
    apiVersion: apps/v1
    kind: Deployment
    name: makepost-deployment
  minReplicas: 2
  maxReplicas: 5
  # targetCPUUtilizationPercentage: 50
Now applying this service using kubectl apply -f kubernetes/makepost-autoscale.yaml will auto-scale the makepost-deployment from 2 to 5 replicas based on the load.
That's a wrap! Do comment down your learnings or doubts below in the comments section.
Thank you!
